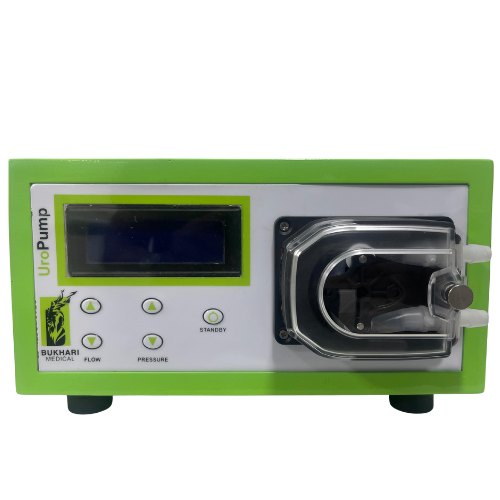
UroPump Irrigation Pump

A Simple Guide to the Tubing Connection


Precision Irrigation for Urological Procedures

UroPump

The UroPump system uses a straightforward “Two-Bag, One-Pump” setup. Please follow these steps for a proper connection:

Components You Will Need:

1. UroPump Unit: The main pump device.
2. Irrigation Fluid Bags (2): Typically, bags of sterile saline or glycine solution.
3. UroPump Administration Set: The dedicated, sterile tubing set.

Key Safety Notes

Always use the UroPump Administration Set recommended by Bukhari Medical. Using incompatible tubing can lead to pump malfunction or inaccurate flow rates.
· Ensure the tubing is primed correctly to avoid air embolisms.
· Do not attempt to connect the tubing while the pump is powered on.

For Visual Assistance: We have created a short, detailed video that demonstrates this entire process. You can view it on our official website or by clicking the link provided by your Bukhari Medical representative.

THE ADDED VALUE

Advantages for the surgeons

_____ 1

Lightweight Design

Easy to handle and transport during procedures.

_____ 2

Low Noise Operation

Provides a comfortable surgical environment.

3 ______

Accurate Pressure Control

Integrated sensor ensures precise organ pressure.

4 ______

Continuous Irrigation

Clear visibility throughout the procedure.

UroPump Irrigation Pump

Step-by-Step Connection Process

Prepare the Pump

Ensure the UroPump is placed on a stable, level surface near the patient. Make sure the main power is off.

Spike the Irrigation Bags

Hang the two irrigation fluid bags on the IV poles.
· Remove the protective cap from the first irrigation bag.
· Take the Y-connector end of the UroPump Administration Set. You will see two separate spikes.
· Firmly insert one spike into the first irrigation bag.
· Repeat the process with the second spike for the second irrigation bag.
· This Y-connection allows the pump to draw fluid from both bags simultaneously or sequentially, ensuring a continuous flow.

Prime the Tubing

Locate the drip chamber on the administration set. Squeeze it gently until it is about half-full with the irrigation fluid.
· Slowly open the flow regulator (the roller clamp) and allow the fluid to run through the entire length of the tubing. This step is critical to remove all air bubbles, preventing air from entering the system.
· Once the tubing is primed, close the roller clamp to stop the flow.

Load the Tubing into the Pump

Open the pump’s tubing compartment door. You will see a designated path for the tubing.
· Place the specific section of the tubing into the pump’s peristaltic mechanism, following the guides or arrows marked on the pump. Ensure the tubing is seated correctly and securely.
· Close and latch the compartment door.

Connect to the Patient

· The distal end of the tubing (with the Luer-lock connector) is now ready to be connected to the patient’s catheter or cystoscope irrigation port using aseptic technique.

TREATMENTS PERFORMED

Applications


UroPump Covers The Following treatments

Urology

TURP Procedures | Bladder Tumor Resection | Stone Management | Prostate Surgery | Endoscopic Urology


Device Information Request

Please complete our contact form to inquire about our cutting-edge medical device. We value your pursuit of medical knowledge and innovation, and we’re here to provide the information you need.